Class06(span,input,form,table)
2022. 04. 21. 수업내용 정리
span, input, form, table…
-
span
-
HTML 문서에서 인라인(inline) 요소들을 하나로 묶을 때 사용
-
그 자체만으로는 의미를 가지지 않지만, class나 id 같은 전역속성과 함께 사용하여 스타일링을 위해 요소들을 그룹화하거나 lang 속성과 같은 속성값을 공유하는 데 유용하게 사용할 수 있습니다.
-
div요소와 매우 비슷하게 사용되지만, div 요소는 블록타입인데 반해 span 요소는 인라인 타입입니다.
-
div vs span
<div id="divtag1"></div> <div id="divtag2"></div> <span id="spantag1">11111</span> <span id="spantag2">22222</span>#divtag1{ width:100px; height:100px; background-color:red; } #divtag2{ width:100px; height:100px; background-color:blue; } #spantag1{ width:100px; height:100px; background-color:red; } #spantag2{ width:100px; height:100px; background-color:blue; }아래는 위의 코드를 실행한 후 나온 결과이다.
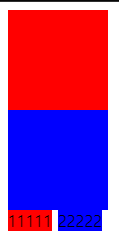
span은 인라인 요소이기에 내부에 컨텐츠가 필요하고 컨텐츠의 크기만큼만 영역을 차지하는 반면, div는 블록 요소이므로 한 칸 모두를 차지하고 세로로 자동 정렬됩니다.
-
-
input
-
input 태그는 사용자로부터 입력을 받을 수 있는 입력 필드를 정의할 때 사용합니다.
-
사용자가 데이터를 입력할 수 있는 입력 필드를 선언하기 위해서 form 요소 내부에서 사용됩니다. 이러한 입력 필드는 input 요소의 type 속성값을 달리함으로써 여러 가지 모양으로 나타낼 수 있습니다.
-
input 태그는 빈 태그이며, 속성만을 포함하고 있습니다.
-
label 요소를 사용하면 input 요소의 라벨을 정의할 수도 있습니다.
  <input type="text" placeholder="아이디를 입력하세요." value="1234" maxlength="10"\>
    <input type="password" placeholder="비밀번호를 입력하세요.">
-
-
form
-
사용자로부터 입력을 받을 수 있는 HTML입력 폼을 정의할 때 사용합니다.
-
아래의 요소들 중 하나 이상을 포함할 수 있습니다.
-
<button> -
<fieldset> -
<input> -
<label> -
<option> -
<optgroup> -
<select> -
<textarea>예시..
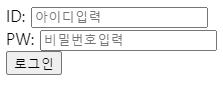
<form action="loginCheck.jsp" method="get">
  <label for="ID">ID:</label>
  <input type="text" placeholder="아이디입력" id="ID"><br>
  <label for="PW">PW:</label>
  <input type="password" placeholder="비밀번호입력" id="PW"><br>
  <input type="submit" value="로그인">
</form>
웹 화면 ↓
-
-
-
table
-
여러 종류의 데이터를 보기 좋게 정리하여 보여주는 표를 의미합니다.
HTML에서는
<table>태그를 사용하여 이러한 테이블을 작성할 수 있습니다. -
table 태그의 구성은 아래와 같습니다.
-
<tr>태그는 테이블에서 열을 구분해 줍니다. -
<th>태그는 각 열의 제목을 나타내며, 모든 내용은
자동으로 굵은 글씨에 가운데 정렬이 됩니다. -
<td>태그는 테이블의 열을 각가의 셀(cell)로 나누어줍니다.예시..
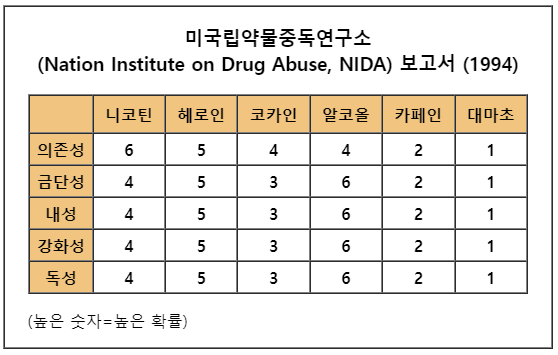
<table width="550" height="250" border="1" cellpadding="0" cellspacing="0"> <tr> <td align="center"> <table width="500" height="200" border="1" cellpadding="0" cellspacing="0"> <caption> <h3 align="light">미국립약물중독연구소<br> (Nation Institute on Drug Abuse, NIDA) 보고서 (1994) </h3> </caption> <tr> <th id="box"> </th> <th id="head">니코틴 </th> <th id="head">헤로인 </th> <th id="head">코카인 </th> <th id="head"> 알코올</th> <th id="head">카페인 </th> <th id="head">대마초</th> </tr> <tr> <th id="name">의존성</th> <th>6</th> <th>5</th> <th>4</th> <th>4</th> <th>2</th> <th>1</th> </tr> <tr> <th id="name">금단성 </th> <th>4 </th> <th>5 </th> <th>3 </th> <th> 6</th> <th>2 </th> <th>1 </th> </tr> <tr> <th id="name">내성 </th> <th>4 </th> <th>5 </th> <th>3 </th> <th> 6</th> <th>2 </th> <th>1 </th> </tr> <tr> <th id="name">강화성 </th> <th>4 </th> <th>5 </th> <th>3 </th> <th> 6</th> <th>2 </th> <th>1 </th> </tr> <tr> <th id="name">독성 </th> <th>4 </th> <th>5 </th> <th>3 </th> <th> 6</th> <th>2 </th> <th>1 </th> </tr> </table> <p align="left"> (높은 숫자=높은 확률)</p> </td> </tr> </table> <style> #head { width: 40px; height: 25px; background-color: rgb(241, 196, 128); } #name { width: 35px; height: 0px; background-color: rgb(241, 196, 128); } #box { background-color: rgb(241, 196, 128) } </style>웹 페이지 화면 ↓
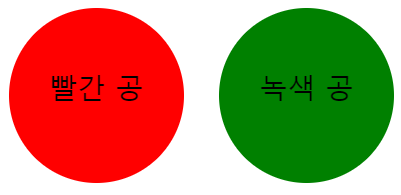
bonus.. (with border-radius).. 테이블과 응용가능
<style>
      div{
            width: 100px;
            height: 100px;
            float: left;
            border-radius: 100%;
            text-align: center;
            padding-top: 35px;
            box-sizing: border-box;
        }
        #div1{
            background-color: red;
            margin-right: 20px;
        }
        #div2{
            background-color: green;
        }
</style>

	<div id="div1">
        빨간 공
    </div>
    <div id="div2">
        녹색 공
    </div>
웹 페이지 화면 ↓
-
-
댓글남기기